


That pile of leftover mulch in your driveway doesn’t have to be a problem—it’s an opportunity. Whether you ordered too much for your spring landscaping project or have extra mulch from a recent delivery, there are smart ways to put every bit of that organic matter to work improving your garden.
Most homeowners end up with extra mulch at some point, and instead of letting it sit in a corner of the yard or hauling it to the curb, you can transform this material into valuable landscaping assets. From refreshing tired garden beds to creating natural pathways, leftover mulch offers practical solutions that save money while enhancing your outdoor space.
Key Takeaways
- Leftover mulch can refresh existing garden beds by adding a 2-3 inch fresh layer over old material
- Extra mulch creates natural, cost-effective pathways that suppress weeds and reduce mud
- Decomposed mulch makes excellent compost when mixed with nitrogen-rich materials like grass clippings
- Applying mulch around trees and perennials provides crucial winter insulation for root systems
- Properly stored leftover mulch under tarps can last 6-12 months for future landscaping projects
1. Refresh and Layer Your Existing Garden Beds
The simplest way to reuse mulch is to add a fresh 2-3 inch layer over your existing garden beds. This technique instantly improves both appearance and function without the work of completely removing old material. Before applying new mulch, rake and break up any compacted areas in the old mulch bed to ensure proper water infiltration and air circulation.
Focus on flower beds, vegetable garden borders, and areas around established plants that need improved moisture retention. The key is ensuring your old mulch underneath isn’t fully decomposed into soil or showing signs of disease or fungal growth that could harm your plants. Not sure whether the material underneath is still usable or ready to be removed? Old mulch can be reused in a few different ways depending on how far it’s broken down, so it’s worth checking its condition before you cover it up again. Fresh mulch layered over partially decomposed material creates an ideal growing environment that gradually feeds the garden soil below.
This layering method works particularly well in high-visibility areas where the aesthetic impact makes the biggest difference. The new layer provides immediate weed control while the older material continues breaking down into valuable organic matter that enriches your garden soil over time.
Best Areas for Mulch Layering
Cover around mailbox posts, newly transplanted flowers, and decorative landscape areas where curb appeal matters most. Apply fresh layers to perennial beds and around established shrubs where the improved appearance justifies the effort. Focus your leftover mulch on these high-impact zones rather than spreading it too thin across your entire property.
Consider the specific needs of different planting areas when deciding how much extra mulch to apply. Areas with trees and shrubs can handle slightly thicker applications, while more delicate flower beds benefit from thinner, more precise coverage that won’t overwhelm smaller plants.
2. Create Natural Garden Pathways and Walkways
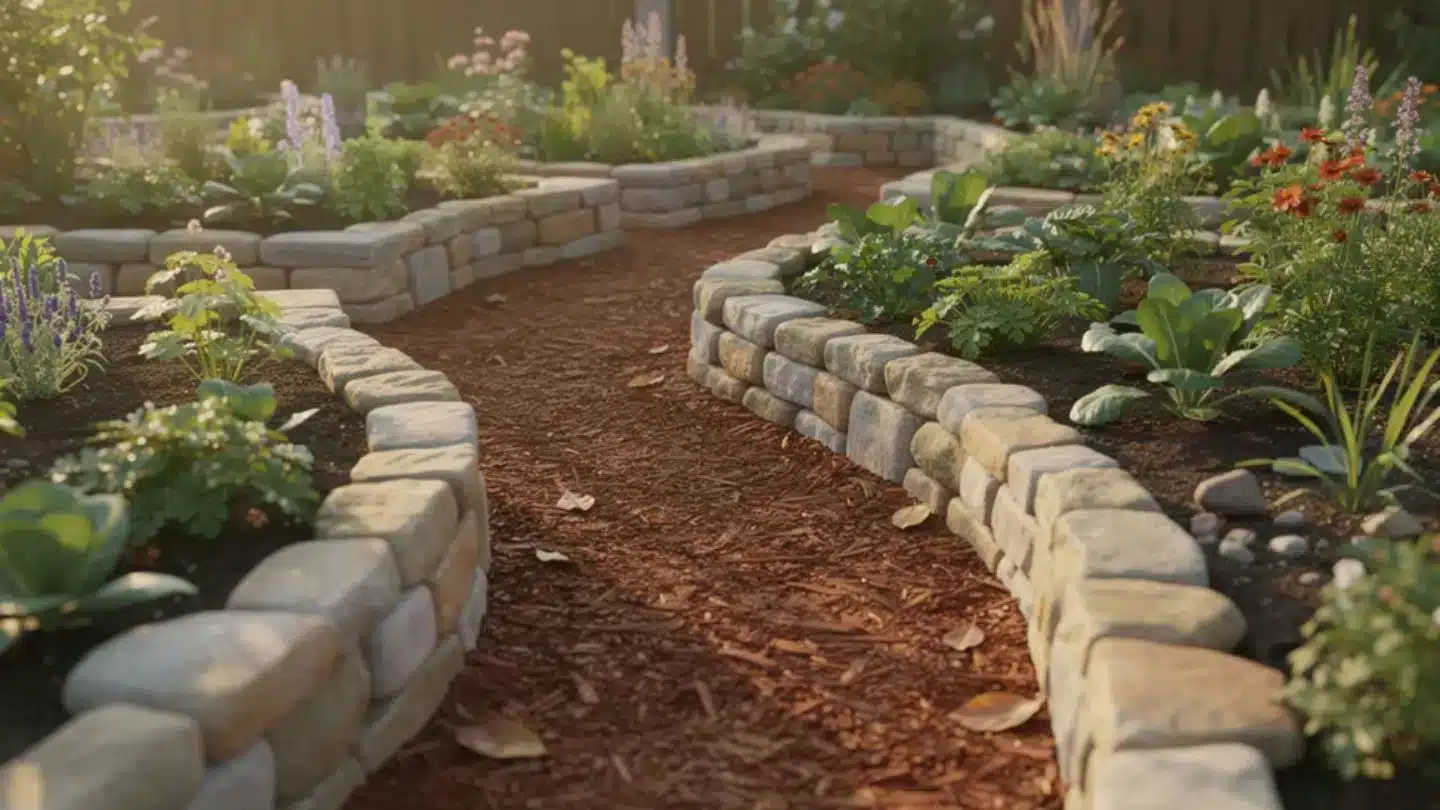
Transform your leftover mulch into functional pathways that connect different areas of your garden while providing excellent weed control. Apply 3-4 inches of material to build natural paths between garden beds and planting areas, creating defined routes that protect your garden soil from compaction during maintenance work.
For the most professional results, apply mulch over landscape fabric or cardboard to create a strong weed barrier that prevents unwanted growth from pushing through. Edge your pathways with stones, timber, or metal edging for a finished look that keeps the material contained and prevents it from spreading into surrounding grass or garden areas.
This approach works especially well with coarser wood chips or bark mulch that resists compaction under foot traffic. The resulting pathways stay firm underfoot while naturally suppressing weeds and reducing mud formation during wet weather periods.
Planning Your Mulch Pathways
Map out frequently used routes between garden areas, tool sheds, and outdoor living spaces before committing your leftover mulch to specific locations. Create buffer zones around raised garden beds using extra mulch for easy maintenance access without constantly stepping on planted soil.
Consider connecting existing hardscape features like patios or decks with natural mulch transitions that blend different elements of your landscape design. These connecting pathways use relatively small amounts of material but create significant visual and functional improvements to your outdoor space.
3. Compost Into Nutrient-Rich Soil Amendment
Mix decomposed leftover mulch with nitrogen-rich materials like grass clippings and food scraps to create nutrient-rich compost for your garden. Wood mulch provides the carbon component essential for proper composting, but you’ll need to balance it with green materials to achieve the ideal 3:1 carbon to nitrogen ratio that promotes efficient decomposition.
Shred larger wood chips or bark pieces using a shovel or rake to speed up the decomposition process in your compost bin. Smaller pieces break down faster and integrate more easily with other organic matter in the pile. Turn the compost pile every 2-3 weeks to ensure proper aeration and prevent odors that can develop in anaerobic conditions.
Avoid composting mulch that shows signs of disease, mold, or pest infestation, as these problems can spread to your finished compost and eventually to your garden plants. Only use clean, healthy material that will contribute positively to the resulting compost quality. Different landscapes benefit from different mulch types — for example, moisture-heavy plant zones often do best with mulches that break down more slowly and resist matting. Matching mulch to your plant style makes leftover material even more useful.
Composting Timeline and Tips on creative ways to use leftover mulch
Expect 6-12 months for full decomposition, depending on your mulch type and local weather conditions. Wood-based materials naturally take longer to break down than softer organic matter, but the wait results in valuable soil amendment that improves garden soil structure and nutrients.
Add water during dry periods to maintain moisture levels similar to a wrung-out sponge throughout the pile. This consistent moisture supports the microbial activity necessary for proper decomposition while preventing the pile from drying out and stalling the composting process.
Use your finished compost to improve soil structure in vegetable gardens and flower beds where plants will benefit most from the added organic matter and slow-release nutrients. The resulting compost provides long-term soil health benefits that commercial fertilizers alone cannot match.
4. Provide Winter Insulation for Trees and Perennials
Apply 4-6 inches of leftover mulch around tree bases and perennial plants before the first frost to provide crucial cold protection during winter months. This insulation layer stabilizes soil temperature and reduces freeze-thaw cycles that can damage plant roots and push newly planted specimens out of the ground.
Keep mulch 6 inches away from tree trunks and plant stems to prevent pest and disease issues that develop when material stays constantly moist against bark. This “donut, not volcano” approach provides protection without creating hiding places for rodents or encouraging fungal growth on plant stems.
Focus this winter protection on newly planted trees, roses, and tender perennials that need extra help surviving their first few seasons in your landscape. Established plants typically need less winter mulching, so concentrate your extra mulch where it provides the most benefit for protecting plants and preserving your landscaping investment.
Plants That Benefit Most from Winter Mulching
Newly planted trees and shrubs in their first 2-3 years of establishment benefit significantly from winter mulch applications that help their developing root systems survive temperature extremes. These young plants haven’t yet developed the deep, extensive roots that provide natural cold protection.
Tender perennials like roses, lavender, and ornamental grasses in colder climates need extra insulation to survive winter temperatures that might kill them without adequate soil protection. Apply thick mulch layers around these plants in late fall and remove excess material in early spring to allow proper soil warming.
Bulb planting areas where you’ve planted tulips, daffodils, or other spring flowers benefit from consistent soil temperature that prevents premature sprouting during winter warm spells that can damage developing flower buds.
5. Share with Community or Store for Future Projects
Offer leftover mulch to neighbors through community social media groups or neighborhood apps where other gardeners often need small amounts for their own projects. This approach builds community connections while ensuring your extra material gets used productively rather than going to waste.
Store extra mulch under waterproof tarps in a shaded area for future landscaping projects when you want to save material for later use. Keep stored mulch off the ground using pallets or a concrete pad to prevent moisture absorption that can lead to decomposition and fungal growth.
Donate excess mulch to local community gardens, schools, or non-profit organizations that need landscaping materials but often lack sufficient budgets for purchasing commercial products. These organizations typically appreciate donations of quality organic mulches that help them maintain attractive, functional outdoor spaces.
Proper Mulch Storage Techniques

Cover mulch piles completely with heavy-duty tarps secured with bungee cords or weights to prevent water infiltration while still allowing some air circulation. Completely sealed plastic tarps can create anaerobic conditions that produce foul odors and harmful decomposition byproducts.
Check stored mulch monthly for signs of mold, excessive moisture, or pest activity that could make the material unsuitable for future garden use. Turn stored mulch occasionally with a rake or shovel to prevent compaction and maintain airflow through the pile that supports healthy decomposition.
Use stored mulch within 6-12 months to prevent over-decomposition that reduces its effectiveness as a surface mulch. Even when mulch is stored well, it keeps aging. Knowing when to top off versus when to fully replace helps you avoid spreading mulch that’s turned more ‘soil-like’ than protective. As organic mulches age and break down, they become more suitable for mixing into soil as organic matter rather than using them as protective surface cover.
Don’t let leftover mulch become yard waste when it can enhance your landscape for months or even years to come. These five approaches transform extra material into valuable landscaping assets that improve plant health, reduce maintenance work, and save money on future garden projects. Start with the method that best fits your immediate needs, whether that’s refreshing tired beds, creating new pathways, or building your soil through composting. Beyond using up leftovers, mulch is one of the simplest upgrades you can give any landscape. It supports moisture control, weed suppression, soil health, and seasonal root protection — which is exactly why it’s worth using every extra bit instead of tossing it.
The key to success with any of these approaches is mulching properly—applying the right depth for the intended purpose and monitoring how the material performs over time. With thoughtful application and basic maintenance, your leftover mulch becomes an ongoing resource that supports healthier plants, cleaner landscapes, and more sustainable gardening practices.
Read More: Mulch Maintenance: The Best Ways: How to Use Mulch to Improve Your Garden Soil Health
Make the Most of Every Scoop
Leftover mulch doesn’t have to sit around or go to waste — it can keep working for you long after the main project is done. Whether you’re topping off beds, building soft garden paths, composting for richer soil, or insulating plants before cold snaps, a little extra mulch is a flexible tool for better curb appeal and healthier landscapes. Using it thoughtfully (with the right depth and placement) stretches your investment and keeps your yard looking intentional instead of unfinished.
When you want fresh material to finish a touch-up or plan the next upgrade, Mulch Pros makes it easy to get what you need without overbuying. We can help you choose the right product and deliver it right where you need it — from pine straw, to soil, to gravel and sand, and even firewood for outdoor comfort. If you’re looking for reliable mulch in Alpharetta, our local delivery helps you restock quickly, match your existing beds, and keep every corner of your landscape looking clean and cared for.
Frequently Asked Questions
How long can I store leftover mulch before it goes bad?
Properly stored mulch under tarps can last 6-12 months, though organic mulches will gradually decompose over time. Wood chips and bark mulch store longer than straw or leaf-based mulches due to their slower decomposition rate. Check stored material regularly for mold, foul odors, or pest infestation before use, and turn the pile occasionally to maintain good airflow.
Can I mix different types of leftover mulch together?
Yes, mixing wood chips with bark or shredded leaves creates varied texture and decomposition rates that can benefit your garden soil over time. Avoid mixing organic mulch with rubber or plastic mulch as they serve completely different purposes and have different longevity. Ensure all mulch types are disease-free and in good condition before combining to prevent spreading problems to healthy material.
Is it safe to use leftover mulch that has white fungal growth?
White mycelia (thread-like fungal growth) are typically beneficial and indicate healthy decomposition processes that improve soil biology. This type of fungus helps break down organic matter and can actually enhance soil healt,h by creating beneficial fungal networks. Avoid mulch with black, slimy, or foul-smelling fungal growth, which may indicate harmful organisms that could damage your plants.
How thick should I apply leftover mulch in different areas?
Garden beds and around plants need 2-3 inches to suppress weeds and retain moisture without overwhelming plant roots. Pathways and high-traffic areas require 3-4 inches to prevent compaction and mud formation under foot traffic. Winter insulation around trees works best with 4-6 inches for maximum temperature protection, but avoid applying mulch thicker than 6 inches, as it can suffocate plant roots and create anaerobic soil conditions.
When should I remove and replace leftover mulch completely?
Replace mulch that has fully decomposed into soil-like material and no longer provides effective weed suppression or moisture retention. Remove mulch immediately if it shows signs of disease, severe mold, or pest infestation that could spread to your plants. Consider complete replacement every 2-3 years for high-visibility areas that need fresh appearance, but work heavily decomposed mulch into soil as organic matter rather than discarding this valuable material.